Domain Whitelabeling with Benchmark Email
Delivery
Updated on September 24, 2021
In our course to provide the best email marketing services to our clients, we keep our delivery team busy with adding new features and improving the existing ones. This time again, our team has created Domain Whitelabeling for those who want to improve their email delivery using Benchmark Email or those who want domain white-labeling.
Your sending domain reputation plays a key role in the acceptance of an email campaign on the ISP’s end. Whitelisting enables you to take complete control of your sending reputation. This authentication notifies ISPs that emails are relayed from a trusted service provider.
To get started with domain white-labeling, see our steps below.
- Publish CNAME records for the Dual DKIM:: This does not require SPF to be set up. However, there are two CNAME Records to be published for the same. Here are the records for your reference:
| 1st CNAME
|
rCLIENTID.CLIENTDOMAIN.com should point to rCLIENTID.benchclient.com
|
| 2nd CNAME |
bmdeda._domainkey.CLIENTDOMAIN.com should point to dkim.CLIENTID.benchclient.com |
- Create your CNAME record, using the record formula above.
CLIENTID is your unique ID within Benchmark Email. Ex. 1234567.
CLIENTDOMAIN is your sending domain. Ex. yourdomain.com
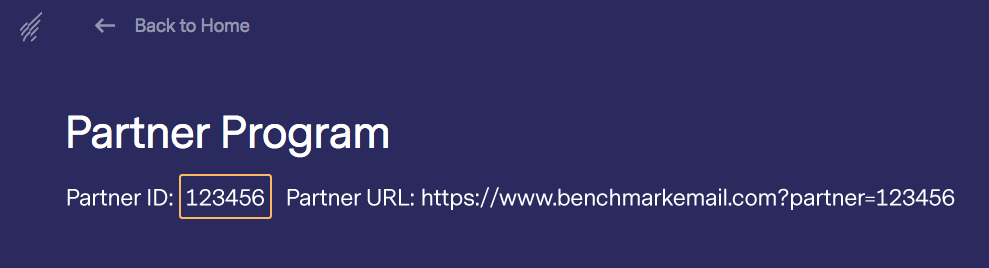
To get your ClientID, follow the steps below.
- Log in to your Benchmark account, and click on your account name.
- Click on the Partner Program option.
- Copy the Partner ID (this is the same as your Client ID).
Note: DO NOT FORGET the “r” in the first CNAME, you can authenticate a CNAME for more than one sending domain.
- With the CNAMEs in place, you can also publish your DMARC policy. Here is the sample of the same:
v=DMARC1;p=none;sp=none;pct=100;adkim=r;aspf=r;rua=mailto:rCLIENTID@dc.bmesrv.com,mailto:YOUREMAILADDRESS;ruf=mailto:rCLIENTID@dc.bmesrv.com,mailto:YOUREMAILADDRESS;rf=afrf;ri=86400;fo=0
In the above DMARC records,
- CLIENTID is your unique ID.
- YOUREMAILADDRESS is your reporting email address. This is the email address where you want the DMARC reports.
For Sub-Account Holders
For all the accounts using our Sub-Account feature. Skip to Step 4 if this does not apply to you.
Sub Accounts using the same domain as the Master account will need to publish individually. See the record example below.
For Master Account:
rMasterAccountClientID.ClientDomain should point to rMasterAccountClientID.benchclient.com
MasterAccountClientID._domainkey.ClientDomain should point to dkim.MasterAccountClientID.benchclient.com
For Sub Account:
rSubAccountClientID.ClientDomain should point to rSubAccountClientID.benchclient.com
SubAccountClientID._domainkey.ClientDomain should point to dkim.SubAccountClientID.benchclient.com
Once the CNAME and DMARC records are updated, the whielabeling flag needs to be activated from our backend.
To activate the whitelabeling flag:
- Contact our support team via email, and inform them that you’ve updated your CNAME and DMARC records. Be sure to share both of the records in the email.
- When the whitelabeling flag is activated, our support team will notify you via email.
We suggest going a bit slow for the first 2-3 days, to make sure that everything is working fine.
Important It may take 24 – 48 hours for the CNAME and DMARC to show up correctly.
Once you have the above records published you’ll have the following benefits:
- NO SPF Records required.
- Sending Whitelabeling* All emails sent from your domain will use your reputation, and not Benchmark’s.
- Protection against domain spoofing and phishing attacks.
How to add the new CNAME
Below we have listed the most popular domain/ web-hosting sites with instructions on how to add a new CNAME record. To see the FAQ of the hosting service, feel free to click on their name.
If you do not have access to update your CNAME in your web hosting site, you can contact your IT administrator or contact your web hosting service.
GoDaddy.com
- Log into your GoDaddy account.
- Then, click on the Avatar icon (top right corner) and select “My Products.”
- From the list provided choose your domain name to access the Domain Settings page.
- In the Additional Settings click on Manage DNS.
- Then, in the Records section, click Add.
- From the Type dropdown choose CNAME.
- Now, complete the following fields:
- Host:rCLIENTID.CLIENTDOMAIN.com/bmdeda._domainkey.CLIENTDOMAIN.com
- Points to: rCLIENTID.benchclient.com/dkim.CLIENTID.benchclient.com
- TTL: 3600
- Lastly, click on Save to update your CNAME.
Bluehost.com
- Click on the DNS Zone Editor icon from the Domains section.
- Click on the domain you want to add a CNAME from the drop-down.
- Go down to Add DNS Record
- Add the desired record name rCLIENTID.CLIENTDOMAIN.com/bmdeda._domainkey.CLIENTDOMAIN.com, to the Host Record field.
- TTL “3600” (can be left at its default setting)
- Choose the CNAME, from the drop-down labeled Type
- Enter rCLIENTID.benchclient.com/dkim.CLIENTID.benchclient.com into the Points To field.
- Then click on the Add Record.
InMotion Hosting
- Log into your CPanel
- Select the Advanced Zone Editor button in the Domains section.
- Click on the drop-down menu, and select the domain in which you will add a CNAME.
- Then Click on the drop down option under Type, and select CNAME.
- Complete
- Name : rCLIENTID.CLIENTDOMAIN.com/bmdeda._domainkey.CLIENTDOMAIN.com
- TTL : 3600
- CNAME : rCLIENTID.benchclient.com/dkim.CLIENTID.benchclient.com
- Done
HostGator.com
- In the Control Panel, search for the domain name and proceed to the DNS Service interface.
- Click the Manage DNS link. The DNS Management Console will pop-up through which you may add any of the following Records:
- Click CNAME Records and in the next screen, click Add CNAME Record.
- There you would find 3 fields:
- Host Name: rCLIENTID.CLIENTDOMAIN.com/bmdeda._domainkey.CLIENTDOMAIN.com
- Value: rCLIENTID.benchclient.com/dkim.CLIENTID.benchclient.com
- TTL: (can be left at it’s default setting)
- Click the Add Record button to submit your Record.
HostMonster.com
- Click the DNS Zone Editor icon, located in the Domains section.
- From the Drop-Down box click on the domain, you’re modifying
- Then, go to Add DNS Record
- Enter rCLIENTID.CLIENTDOMAIN.com/bmdeda._domainkey.CLIENTDOMAIN.com, in the Host Record Field
- TTL “3600” (can be left at its default setting)
- Click on CNAME from the dropdown menu.
- Enter rCLIENTID.benchclient.com/dkim.CLIENTID.benchclient.com into the Points To field.
- Then click on Add Record.
Arvixe.com
- Select Add Record.
- In the drop-down menu, switch the Record type to CNAME.
- In Domain name section, add rCLIENTID.CLIENTDOMAIN.com/bmdeda._domainkey.CLIENTDOMAIN.com
- In the Canonical name, add rCLIENTID.benchclient.com/dkim.CLIENTID.benchclient.com
- Then, select OK.
- Select Update in the pop up. (If you adding many records, you don’t have to select update until done.)
CloudFlare.com
- Sign into your Cloudflare account.
- Select your domain, from the dropdown menu located on the top left
- Click on the DNS settings tab.
- Last, add the CNAME records: rCLIENTID.benchclient.com/dkim.CLIENTID.benchclient.com
Networksolutions.com
- Go to the DNS Manager Settings page,
- Then, in the Host Aliases: CNAME Records section, select Add/Edit.
- You will see your current CNAME listed in an editable form.
- Enter or edit your subdomain in the Alias text box.
- For example, if you picked “web.mydomain.com” as your custom domain, enter “web”
- Or, if you’re using a root domain such as “www.mydomain.com” then you’ll want to enter “www”
- Select Other Host from the radio button
- Enter rCLIENTID.benchclient.com/dkim.CLIENTID.benchclient.com in the other host field
- Last, click Save Changes
Ipage.com
- Head into your Domain Central.
- Select the domain you want to add/edit a CNAME.
- Then, select DNS
- In Modify, click on CNAME records
- Enter the following
- Host : rCLIENTID.CLIENTDOMAIN.com/bmdeda._domainkey.CLIENTDOMAIN.com
- Points to: rCLIENTID.benchclient.com/dkim.CLIENTID.benchclient.com
- Last, click Add.
Name.com
- Click on the Domains tab, and select my domains list (Top Menu).
- Select the domain you wish to create a CNAME record for.
- Now, on the left select DNS Records.
- Here you will add the CNAME record, provided by Benchmark.
- Select CNAME from the drop-down menu.
- Enter your sending domain as rCLIENTID.CLIENTDOMAIN.com/bmdeda._domainkey.CLIENTDOMAIN.com in the Host field.
- Add rCLIENTID.benchclient.com/dkim.CLIENTID.benchclient.com to the Answer field.
- Enter the desired TTL, or just leave it default
- Finally, select the blue Add Record button.
If you need more help understanding the Domain Whitelabeling process, please feel free to contact our Support team via LiveChat, Email, or by phone.
 Delivery