Benchmark Email Help Center

Knowledge Base Home aero-right Image Gallery aero-right Adding Animated GIFs to your Email

Adding Animated GIFs to your Email

Image Gallery Updated on September 29, 2022

Enhance your emails by adding animated gifs and engage with your subscribers by sharing more entertaining visual content. Begin creating amazing email campaigns!

Please note that the process to add animated GIFs to your email will begin in the Design step of creating an email. Adding a GIF that is saved on your computer requires the same upload steps as an image. For steps on how to upload an animated GIF saved on your computer, click here.
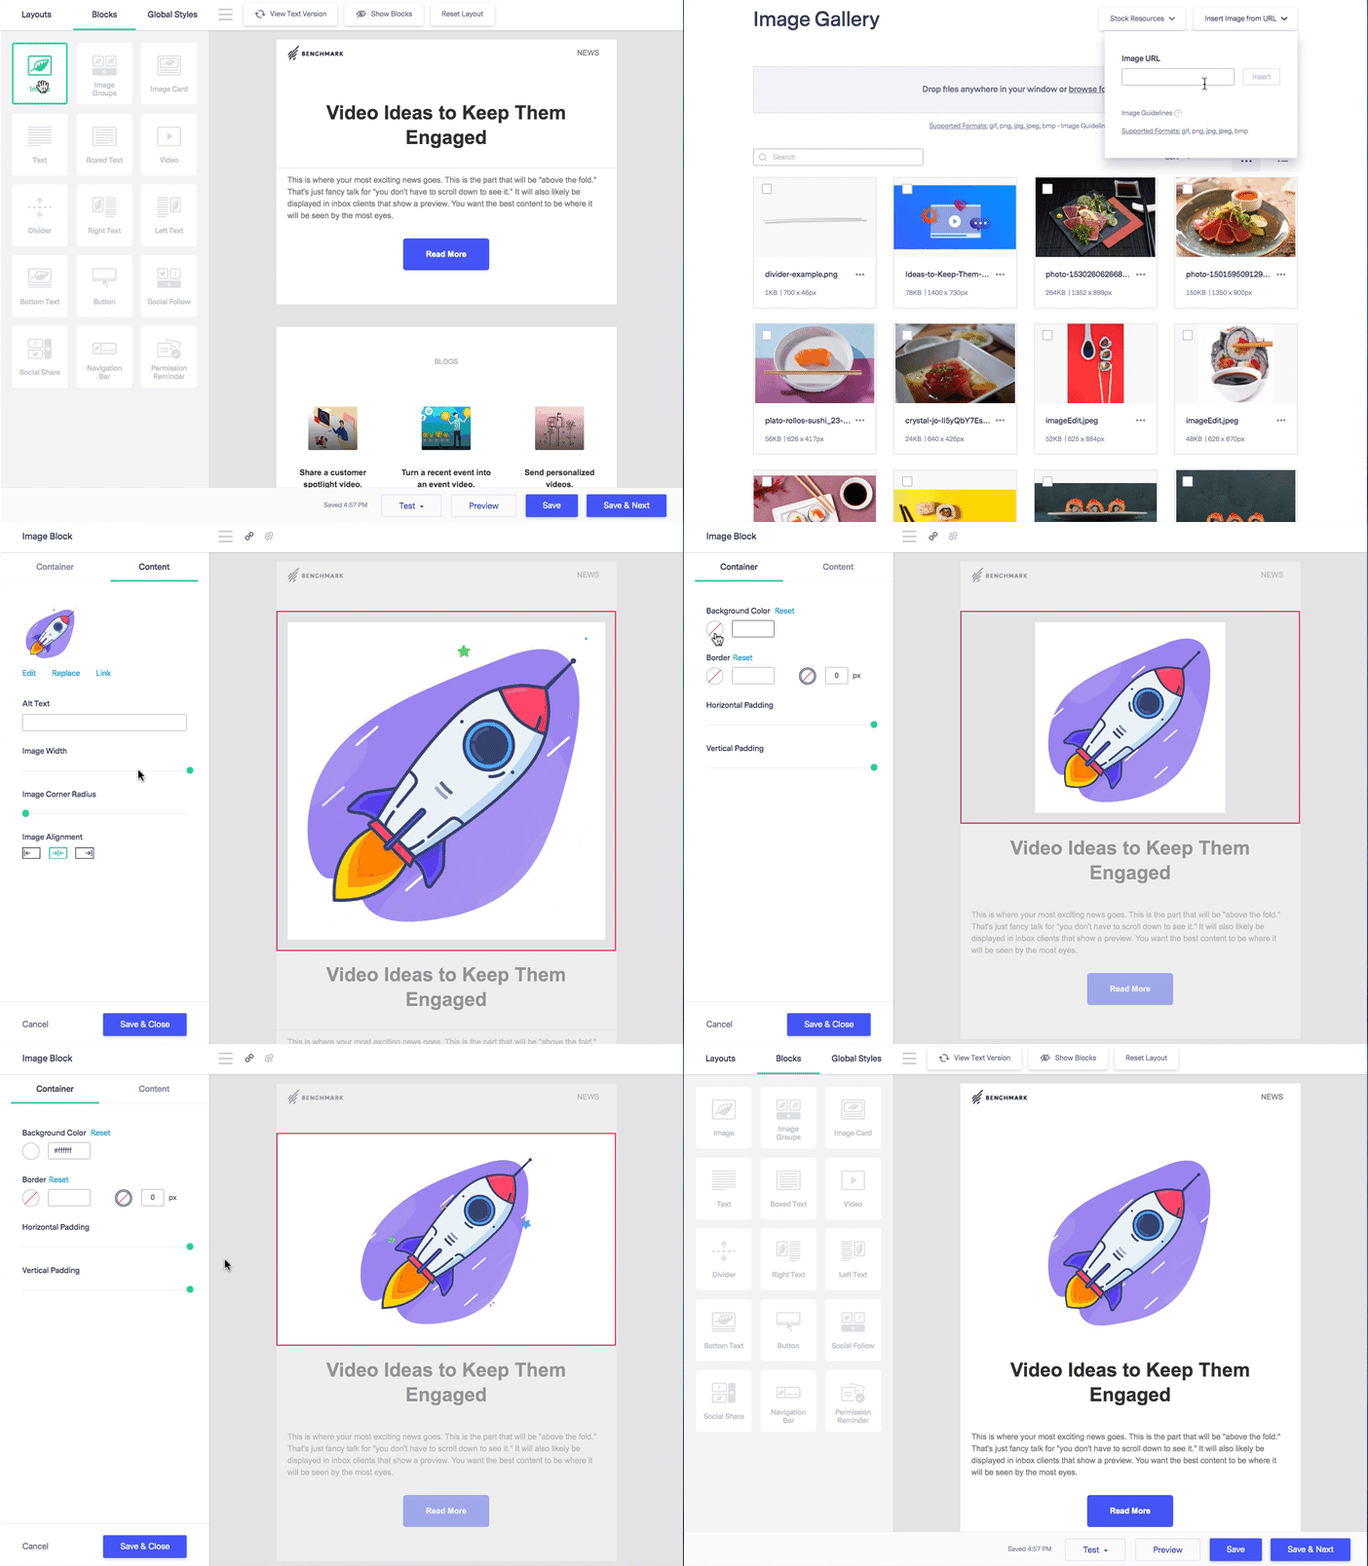
  1. In your email template, drag an Image block and place it in the desired section of your email.
  2. Click on browse for file.
  3. Click on Insert Image From URL and paste in the GIF URL in the space provided.
  4. Select Insert. The GIF will automatically be inserted in your email template.
  5. You can customize the background color of your GIF, align the position and more! When done, click Save & Close.

Did you know you can use a third party like giphy.com for animated GIF files? Since Benchmark allows you to import the image files using URL, all your animated GIF files can be imported from platforms like GIPHY.

The following are the steps to upload your animated GIFs to GIPHY. 

  1. In your GIPHY account, click on Upload.
  2. Choose the option to upload your GIF.
    • Browse for a file; from your computer
    • Drag and Drop the GIF
    • Paste the GIF URL; if it exists elsewhere.  
  3. Complete any required sections, and click on Upload to GIPHY.

See the steps below to learn how to get a URL from a GIF in your GIPHY account.

  1. In your GIPHY account, choose the GIF you’d like to use by clicking on it. If you have your own GIF files, click on your username image, to view your uploaded GIFs.
  2. Then, click on the copy link and copy the GIF link.
  3. Back in Benchmark go to your Image Gallery and paste the GIF URL. Steps are provided a the beginning of this FAQ.

CONSIDER

  • If you add GIFs via URL make sure your URL is an image URL ending in .gif and not just any website URL (example GIF URL: https://i.giphy.com/l0O9xQNSsQKmfSeUU.gif)
  • You can change the order GIFs will appear on your channel page by dragging and dropping the files or clicking “Reverse Order.” This feature is available if you’re logged in. 
  • You can add relevant tags to your GIFs, separated by commas, and add a Source URL to give credit to the original source. 

You can also change your GIFs from Public to Private. Private GIFs cannot be seen by anyone but you when you are logged in and can’t be shared. Settings will be applied to all the GIFs in your upload. (source: Giphy.com)

CONSIDER

  • If you need to edit your GIFs, we recommend doing it in the gif creator you used, or you can use the edit block options for background, border, padding, and alignment. However, do not edit your GIF using our Image editor as it is not designed for GIF files.
  • If you decide to use an image URL rather than uploading it to your gallery, please note that if the image is deleted from it’s hosting service, it will be removed from any email campaign where you previously added it.
  • For the best email performance, we recommend using GIFs no larger than 200kb. You can upload a max size of 500kb and 600px width. A GIF larger than 500kb in size or 600px in width will be compressed. This will result in the loss of GIF property and only its first frame will show up as an image in the campaign. Check out our blog on How to Use GIFs with Email Marketing.
  • Since Outlook is one of the ESP’s who does not support animated GIFs. Instead, only the first frame will show. However, in some cases, your GIFs will display properly. Outlook 2007 – 2013.
  • You can add a GIF in any of the Image blocks provided in the Drag and  Drop Editor.

SUGGESTION

To learn about our supported images, please click here.


If you have any questions, please contact our support team.