How to use the Update Contact Details Node
Automation Pro
Updated on February 12, 2020
You can set up the Automation Pro journey to automatically update contact details with relevant tags based on email and website engagement. By updating your contact’s details, you can also create new segments or move contacts from one segment to another. These segments can be used to plan both online and offline future marketing strategies for your database.
The Update Contact Details option is available in the Action nodes. We recommend using the Multiple Conditions node first then use Update Contact Details.
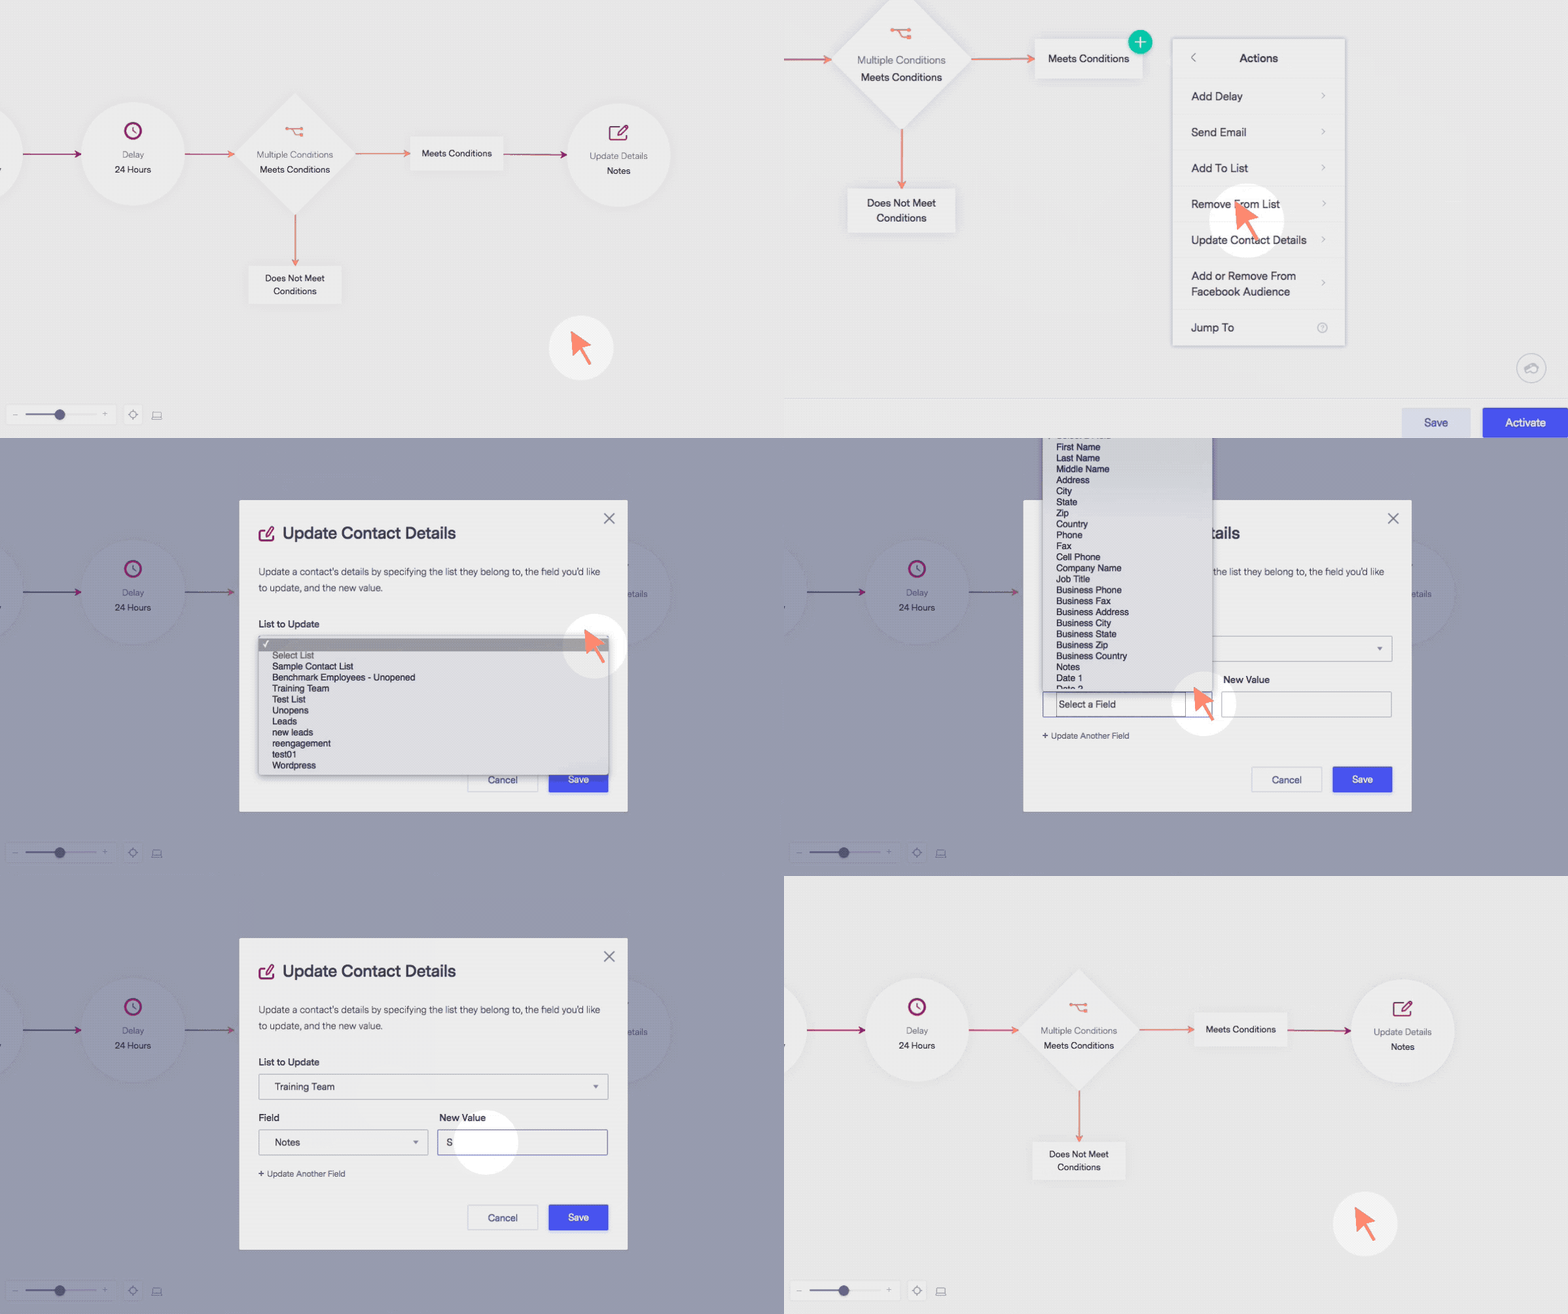
- In your Automation click the plus icon on the node that will trigger the update to happen.
- Select Action, and then click on Update Contact Details.
- Now, select the list you want to update.
- In the Field box, select the field associated with your segment that will get updated.
- Add the New Value your contact will get. If you are using a segment, then the value must match your segment; otherwise, the details can’t update.

Once you set up the node, you can continue your automation path or activate your automation.
Suggestions
- We recommend that you first apply the Multiple Conditions node and then update your contact’s information.
- Using the Multiple Conditions node will let you filter which contacts have met specific conditions. For example, if subscribers purchased an item on your website, the “Customer Type” field will be updated with “Paying Customer” so they can be grouped into one segment.
- The Update Contact Details action works especially well with segments.
- The field used for segmentation should also be the one you are updating. Depending on your contacts web or email behavior, subscribers can move from one segment to another and receive individual follow-ups.
- If you want to know how to create a segment, click here.
To better help, we created an example scenario in which it would be useful to use the Update Contact Details node.
Example Scenario
Let’s say, you create an automation for all of your new subscribers, and within that automation, someone makes a purchase on your site. That subscriber is no longer just a “subscriber” they are now a paying customer. Depending on your marketing strategy, you might decide to send them on a different path in your automation that will cater to paying customers. Check out the video below to see the steps we took to create this scenario.
First: Create your segment
Before getting started you’ll want to have at least one segment created in your list. However, creating a segment isn’t mandatory. We do recommend to use the Update Details node along with Segments for better list management. The segment is used to update the contact details within the automation. Having the segments will allow you to push contacts from one segment to another. For example, from a Visitor segment to a Paying Customer segment. Here is an example of a segment we created for the automation.
Here are the steps we took in the video.
Segment
Paying Customers
Field Name: Extra 3
Contacts match any of these conditions
Contains: Paying Customers
How you chose to name your segments is totally up to you! To learn how to create a segment, click here.
Second: Create your Automation
In the steps below, we used the “New Subscriber” trigger that only targets new signups.
- Go to Automation Pro
- Select New Automation, and give it a name.
- In the next popup select the type of Automation you want to use. For this example, we used “Start from Scratch.”
- Next, you’ll need to Set a Trigger. We used Contact Joins a List. Select which contacts you will target and select a list.
- Then, click on the Create Step box and select Action and select Send Email.
- Create a New Email or Duplicate an existing email. You’ll need to go over email details and design.
- When you are done in the email editor, click Save & Next, and you will be taken back to the canvas.
- Automatically a Delay Node will appear. The Delay node is used to give time between your next node
Third: Update your contact’s details
Now for the fun part. In the next step, you will begin the updates to your contact’s details.
- Click on the Plus icon and select Condition, then choose Multiple Conditions.
-
- Select your condition. For this example, we used Has clicked a link.
- Two new nodes will appear, Meets Conditions and Does Not Meet Conditions.
Meets Condition
- Click on the Plus icon and select Action.
- Then, scroll and click on Update Contact Details
- Select the list you segmented earlier.
- Next, select the segmented Field.
- Last, add the value. Ex. Paying Customers.
Does Not Meet Conditions
- Select what you want to happen next.
- Remember these are subscribers who didn’t meet the conditions set. You could send another email, remove them from your list, or use any other option available.
- What we’d recommend is to target those contacts who did not open or clicked on your email once again. To do that you can continue the automation with a Send Email action. The goal is to turn those visitors to paying customers.
- Once done, activate your automation.
Important
When adding or changing nodes in an automation, please make sure you click on the SAVE option when done.
If you have questions, please feel free to contact our support team via Email, LiveChat or Phone.
 Automation Pro
  How to use the Update Contact Details Node