Before you can add images to your emails, you must first upload them to the Image Gallery. There are two ways to add images to your gallery, via the Image Gallery itself or by using one of the image blocks in the Drag and Drop editor.
IMPORTANT
By uploading an image to your account, you agree you have the right to use and reproduce the image and that it does not include prohibited content.
Do you need to edit your images? Click here to learn how.
To learn more about our supported image formats, please click here. Troubleshooting images in emails.
Benchmark provides up to 1GB of free image hosting for all free accounts. Paid accounts get unlimited image hosting at no additional cost.
Image Block
Adding an image via the Image block is probably the most convenient way to add an image to your email. While you are creating your email, you can drag and drop an image, you can upload an image or select from images already in your gallery. In the following steps, you’ll learn how to add an image using the Image blocks in the Drag and Drop editor.
Click on the Image block and drag it into your email layout.
Then drag and drop your image directly into the block or click on browse for a file, and select an image from your gallery.
If you’d like to upload an image from your computer click on the browse for a file option and in the Image Gallery select browse for files.
Now, the Image Block options will appear on the left.
You can set the horizontal and vertical padding by scrolling the green dot.
Align your image using the alignment options. If your image is taking all the space, then you will not notice any changes to the alignment.
Hit Save & Close when done.
What you can do with this block
Or by using the same background color of your image in other blocks, you can have great designs
Using images with no background allows you to merge your image with other blocks by using the same background color
By default, this block adds 2 image sections to your email layout. In this block you can:
Click on the Image Groups block and drag it into your email layout.
Then drag and drop each image directly into the block or click on browse for a file, and select images from your gallery.If you’d like to upload an image from your computer click on the browse for a file option and in the Image Gallery select browse for files.
By default, this block adds two images sections to your email layout. In this block you can:
Add more images to the group by clicking on the plus button.
Also, you can change the layout by adding images in vertical or horizontal positions.
Finally, change the gutter size between images.
To set the alignment option, click on the image inside the block, you will see the alignment options. By clicking on the image you will find the Edit option, use this option to resize your image add text or a frame to your image.
This block allows you to add an image and text to the same frame.
To add an image card block:
Click on the Image Card block and drag it into your email layout.
Then to add the image, you can drag and drop it directly into the block or click on browse for a file, and select an image from your gallery.If you’d like to upload an image from your computer click on the browse for a file option and in the Image Gallery select browse for files.
By default this block adds two sections into your email layout, where you can:
Add text and choose the text position. For better display keep your text short or according to your image size.
Change the background and border color.
Set the horizontal and vertical padding of the entire Image Card Block.
Set text position
Depending on the text position you will set the image alignment and image area.
Align your image to the edge by clicking the check.
Click on the Image Caption block you need, it can be Right Text, Left Text, or Bottom Text, and drag it into your email layout.
Then to add the image, you can drag and drop it directly into the block or click on browse for a file, and select an image from your gallery.If you’d like to upload an image from your computer click on the browse for a file option and in the Image Gallery select browse for files.
By default this block adds two sections to your email layout, where you can:
In the Content tag:
Add text and choose the text position. For better display keep your text short or according to your image size.
Select up to 3 images to add to the block.
Depending on the text position you will set the Image alignment and image area.
Set the line-height of the text.
In the Container section: set the padding and add a background color.
Click Save & Close.
What you can do with this block
Bottom Text Block with 3 images
Bottom Text Block with 1 image and Social Follow Block on the bottom with the same background color
Left and Right Text position
You can replace, edit, or add a link to an image, just click on the image and the editing block will appear on the left. You will see other options like image alignment, adding a background color, borders, or padding.
Open a browser window and go to the page containing the image you want to use in Benchmark Email.
Move your mouse over the image and right-click the mouse button.
Select Copy Image Location or View Image.
Now, copy the URL provided.
For Internet Explorer & Microsoft Edge
Open a browser window and go to the page containing the image you want to use in Benchmark Email.
Move your mouse over the image and right-click the mouse button.
Select Copy link from the pop-up menu or you can select Open in new tab or window option and copy the URL directly from the address bar.
For Safari
Open a browser window and go to the page containing the image you want to use in Benchmark Email.
Move your mouse over the image and right-click the mouse button.
Select Copy Image Address from the pop-up menu or you can select Open Image in New Tab or New window option and copy the URL directly to the address bar.
For Chrome
Open a browser window and go to the page containing the image you want to use in Benchmark Email.
Move your mouse over the image and right-click the mouse button.
Select Copy Image Address from the pop-up menu or you can select Open in new tab option and copy the URL directly from the address bar.
We suggest adding Alt Text, which is a short description of what your image is, for those recipients who have images blocked or turned off in their inbox.
We suggest adding Alternative Text to all your images. Alt text can be helpful to those contacts who are visually impaired and are using screen readers.
You can easily add Alt Text to any image block within your design. We recommend adding your Alt Text when adding your images, or you can add it later.
To add Alt Text, follow these steps:
Click on the block, and then on the image, you want to add the Alt Text.
Then, in the Alt text area, add the image description.
CONSIDER
By using Alt Text, Google will understand your images, which means better rankings.
A good Alt Text is a sentence explaining what is happening in the image.
Use specific keywords in your Alt Text. Think about what the users will type to locate your images.
Don’t use more than 125 characters, including spaces, and don’t include special characters.
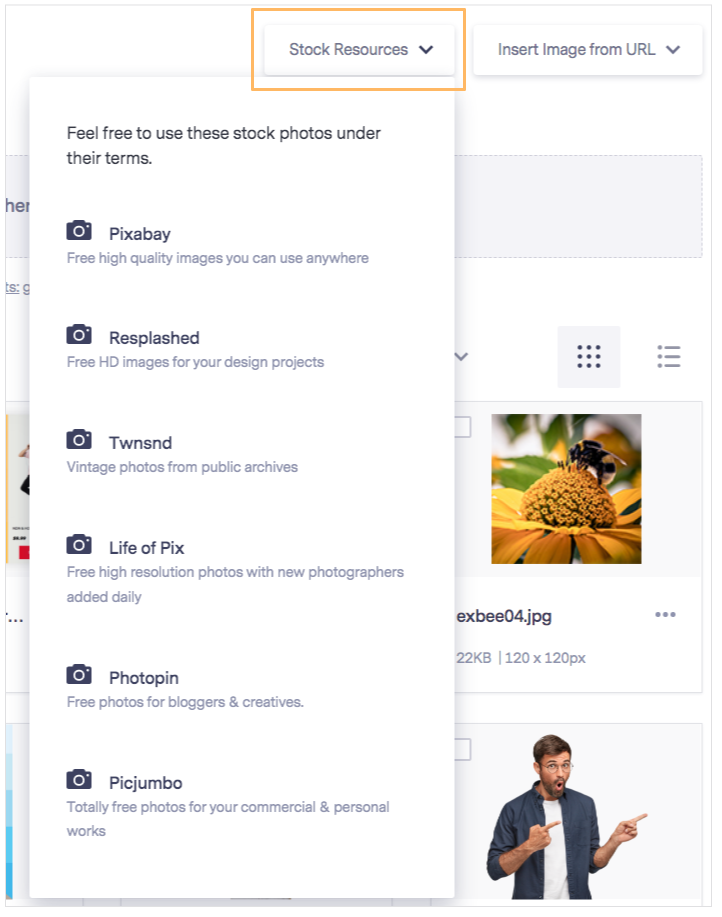
Benchmark Email does not provide free images, aside from the ones in the Premade templates. However, check out our stock photo resources if you need free resources. When you choose this option, a new tab will be opened on their site. To see this option, open an image in the Drag & Drop editor, and then select Stock Resources. You’ll need to download or save the photos and then upload them to your Benchmark Gallery.
 Image Gallery